How to Draw Eye Expressions Step by Step
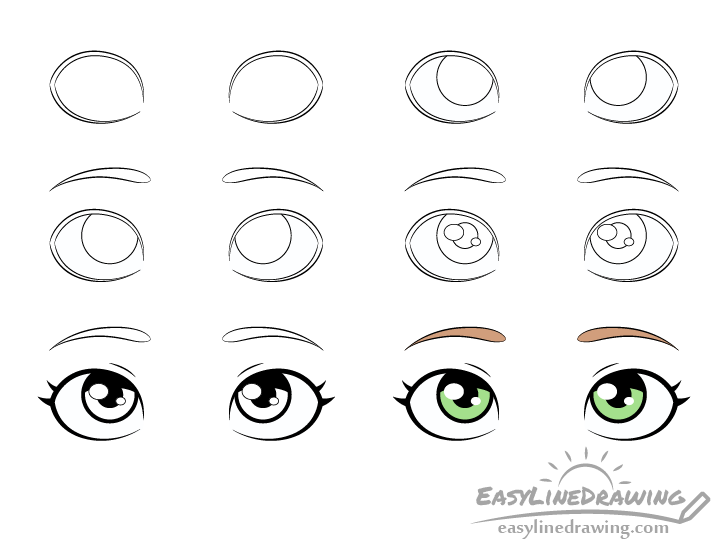
This tutorial shows how to draw eight different eye expressions in a cartoon style with six drawing steps for each of them.
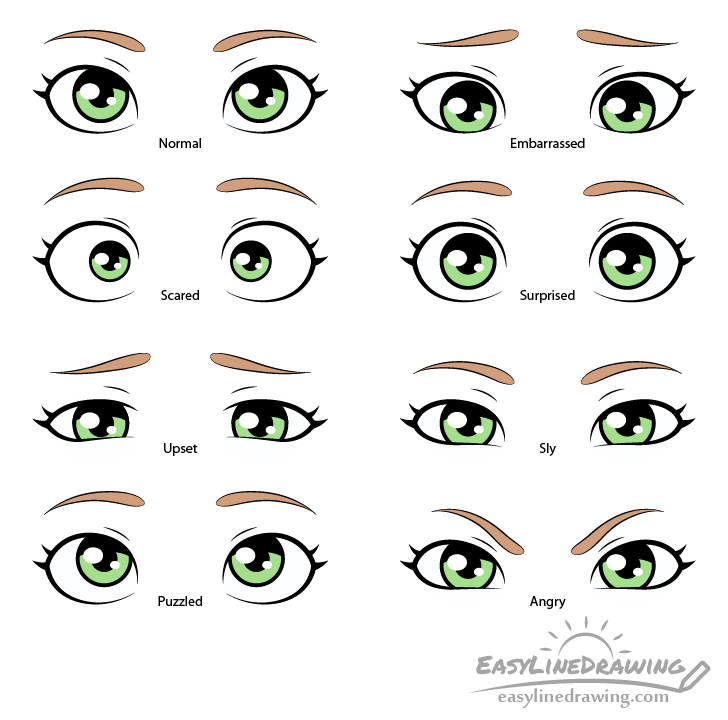
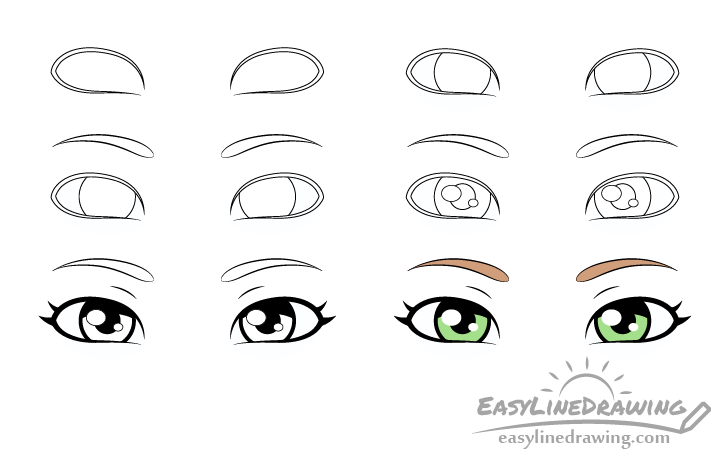
You can see a preview of the different expression in the example above.
This tutorial is more advanced (but should still be fairly easy) than some of the other ones here on EasyLineDrawing in that it has more detailed and in depth drawing instructions and explanations. It’s also fairly long and while you don’t need to go through every expression it is recommended that you read the instruction for drawing the first pair of eyes (normal eye expression) before looking at the others. The reason for this is that the normal expression is the one that all of the other ones are based on. For example when the instructions are to draw the eyes wider or make the irises smaller it means in relation to their normal state. The first example also has more detailed drawing instruction where the rest are somewhat simplified to avoid repetition.
Also as already mentioned the eyes in this tutorial are drawn in a style that is fairly common to cartoons and fairly stylized characters. For drawing an entire face in this type of style see:
How to Draw a Girl Step by Step
Please note that the lines in all of the steps of this tutorial have been made dark so that they are easier for you to see. You should however start the drawing in pencil (unless drawing digitally) and make lights lines that can be easily erased in case you need to tweak things or make a mistake. You can darken your lines once you feel that everything looks right. For this particular tutorial it may be best to use a thin black marker to eventually go over your lines and to shade in the dark areas of the eyes. You can however also do it with the pencil.
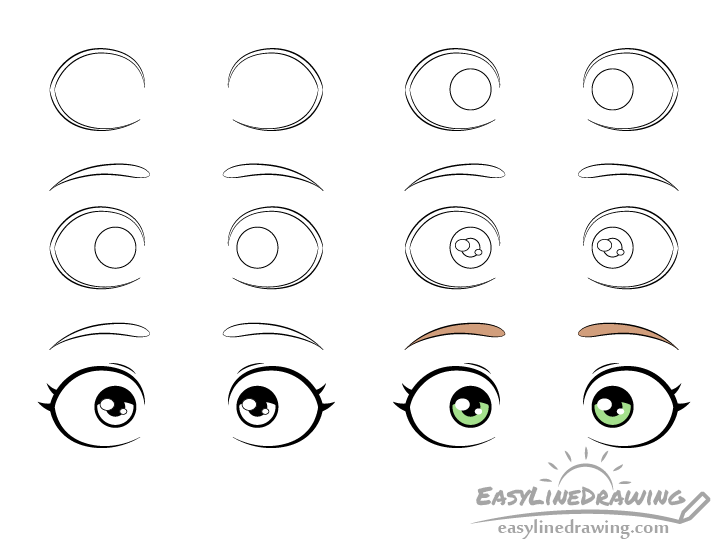
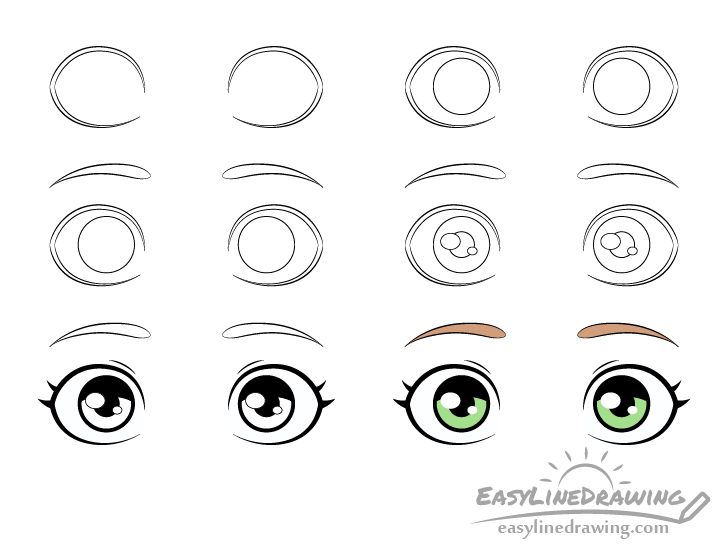
How to Draw a Normal Eye Expression Step by Step
This first example is of the eyes in their normal/relaxed state. When the instructions for the other expressions say to draw the eyes wider/narrower, etc… That means in relation to these.
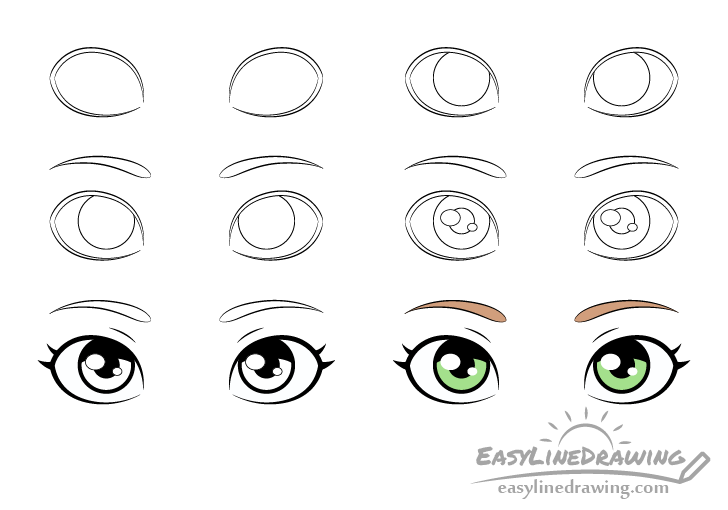
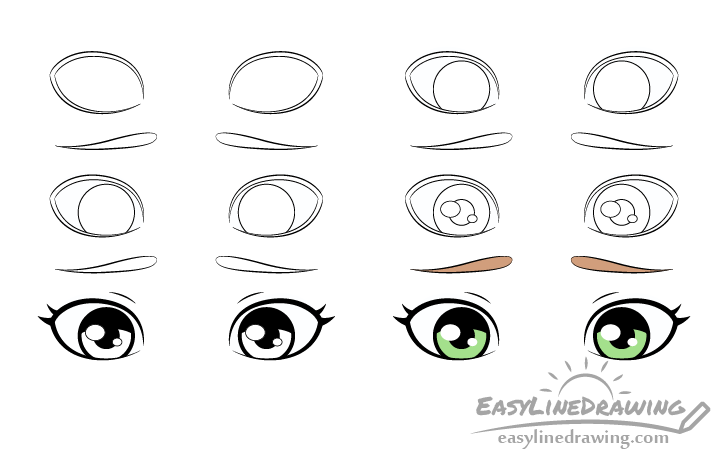
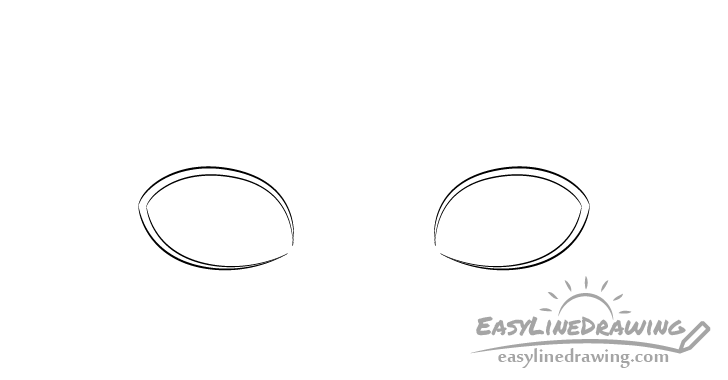
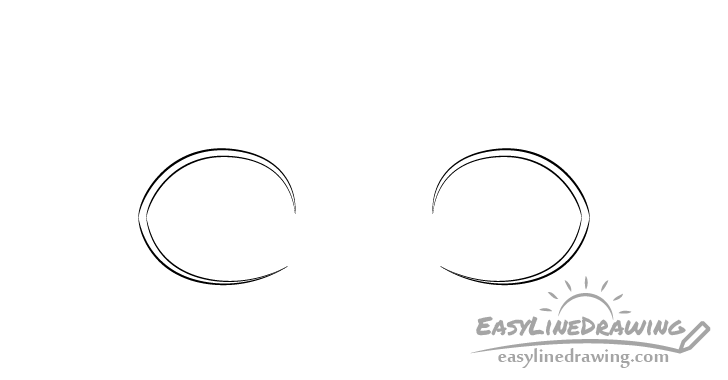
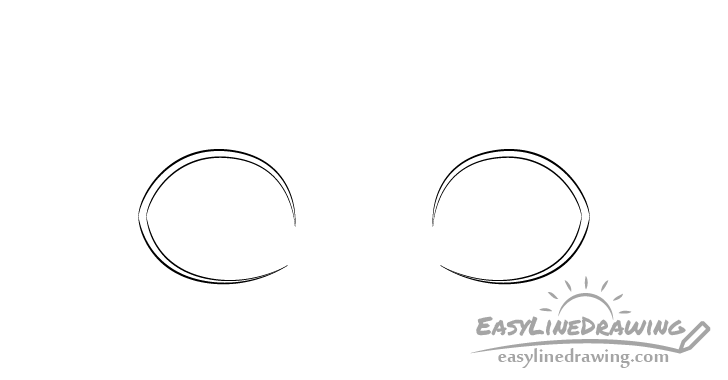
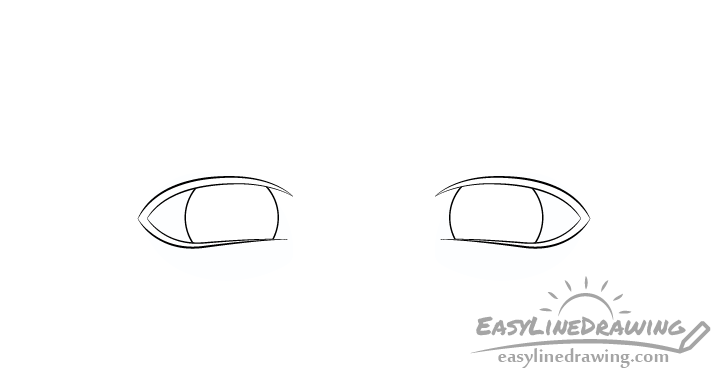
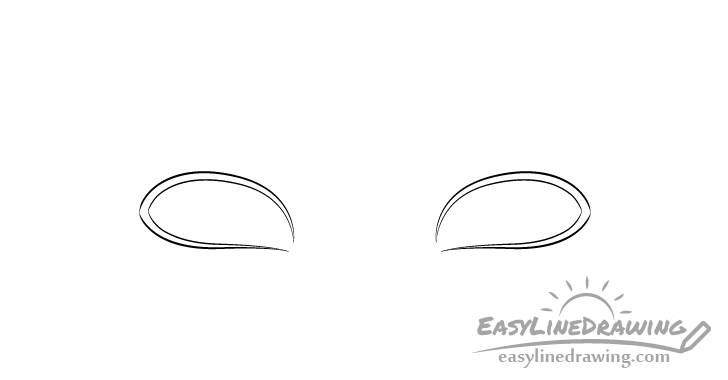
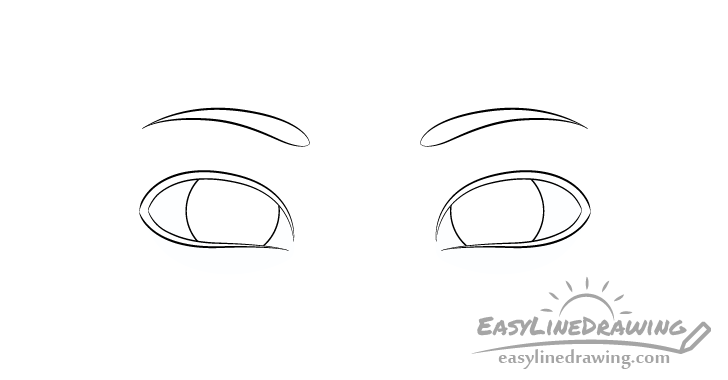
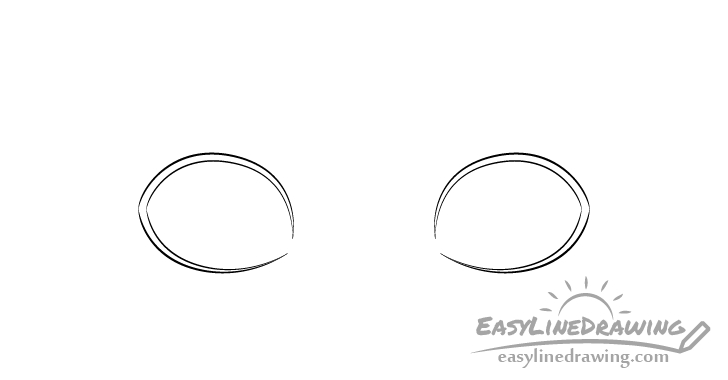
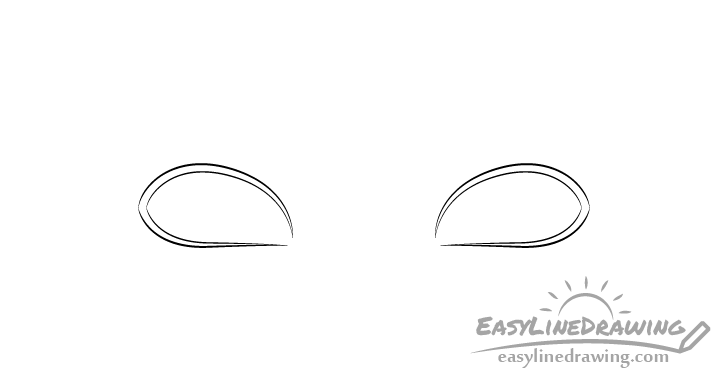
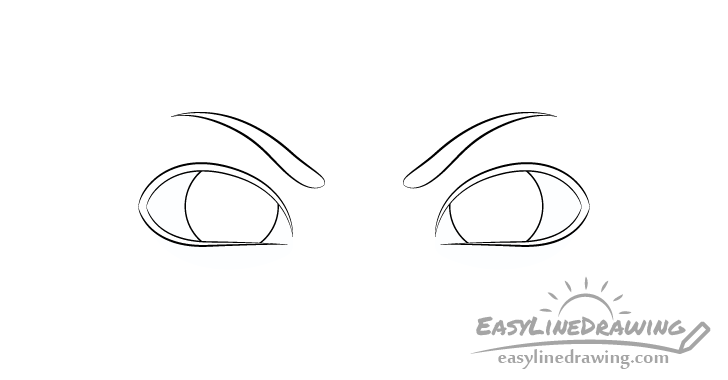
Step 1 – Draw the Outlines of the Eyes
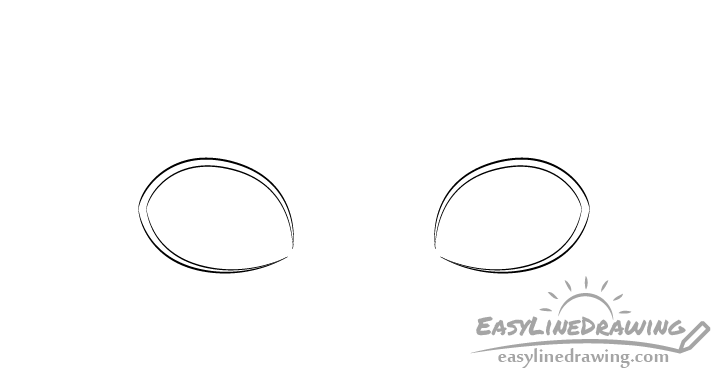
As these are stylized/cartoon eyes draw them much wider and larger than you would real eyes.
Begin the drawing with an outlines of their outer shapes. These outlines will also partially act at the eyelashes.
Make the outlines thicker towards the outer ends of the eyes and thinner towards their inner ends. Leave a little gap in the outline at the inner ends as well.
Also draw each eye to be angled slightly downwards towards the middle of the face (the inner end should be lower down than the outer end).
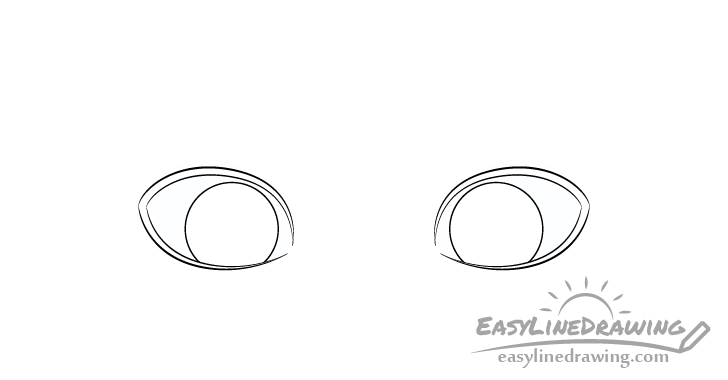
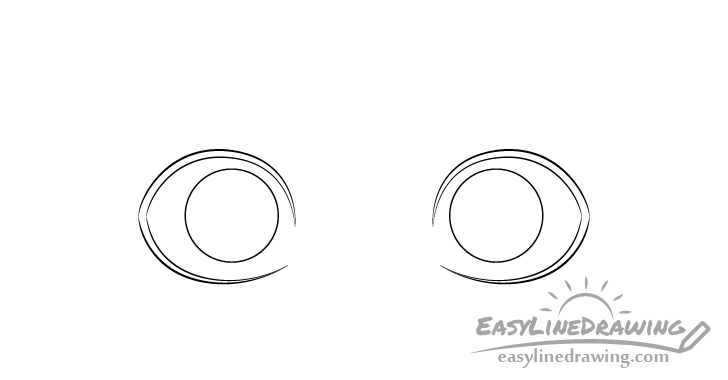
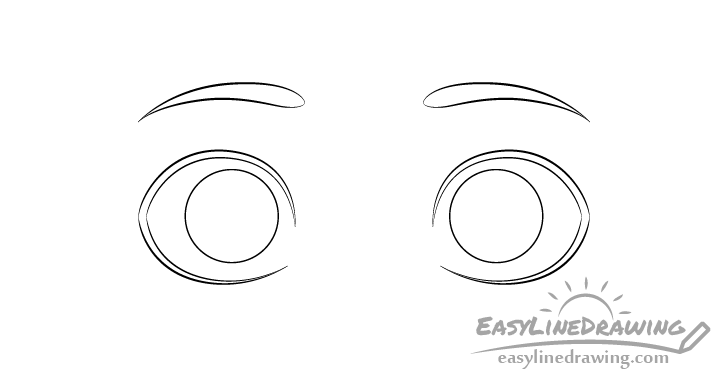
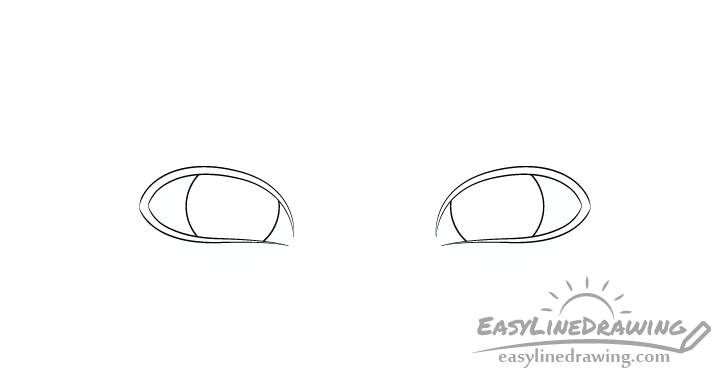
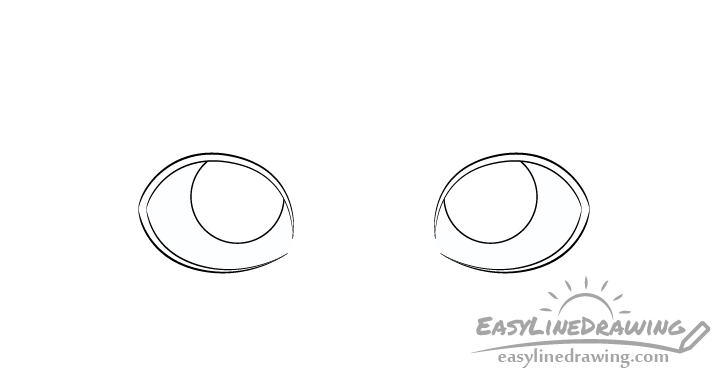
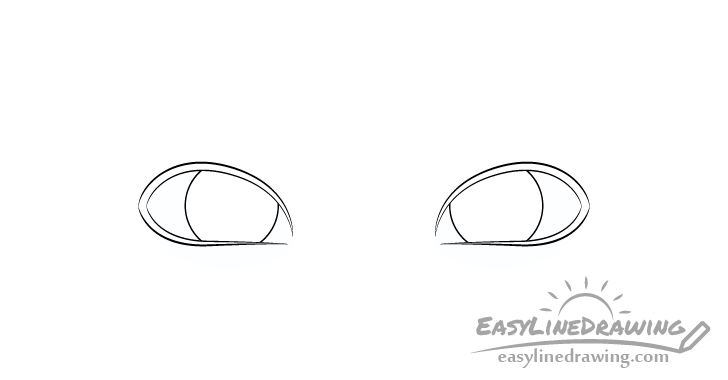
Step 2 – Draw the Irises
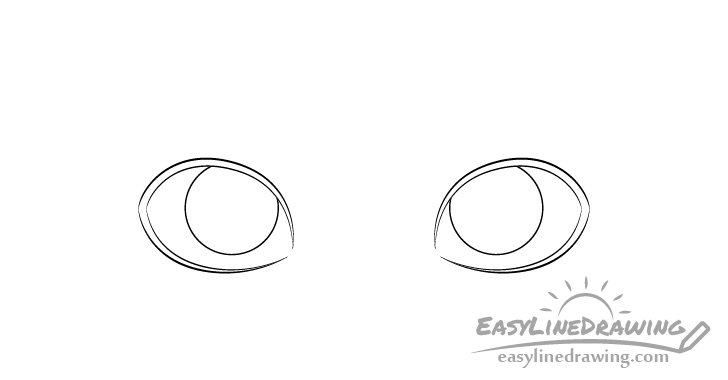
Make the irises round and fairly large. Position them so that they are just slightly covered by the upper eyelids and are a little bit up from the bottom eyelids.
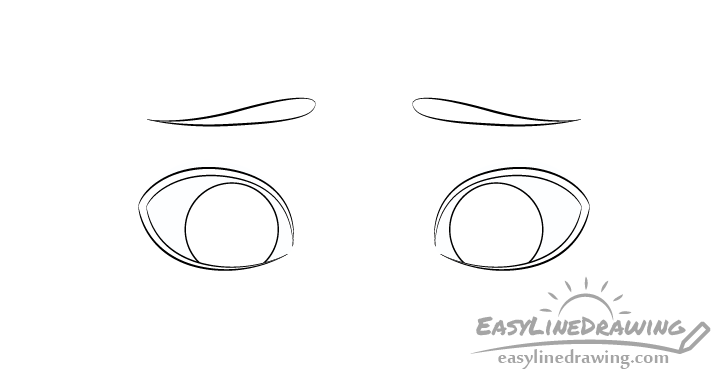
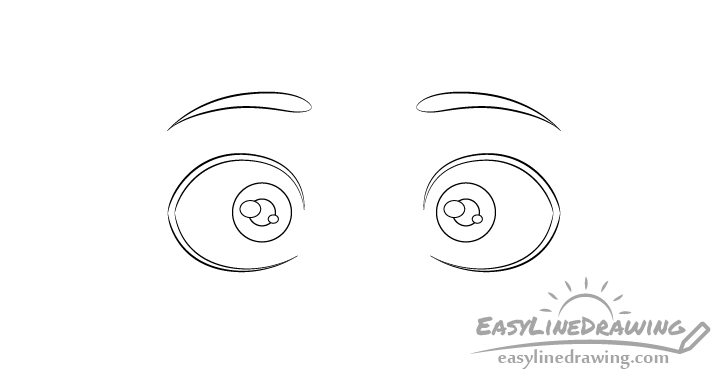
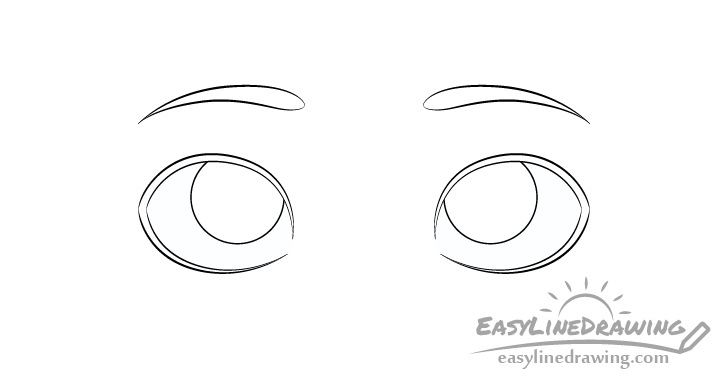
Step 3 – Draw the Eyebrows

Above the eyes add the eyebrows. Draw each of these in a smooth curve with thicker inner ends and pointy outer ends. You can angle them just a tiny bit inwards as well.
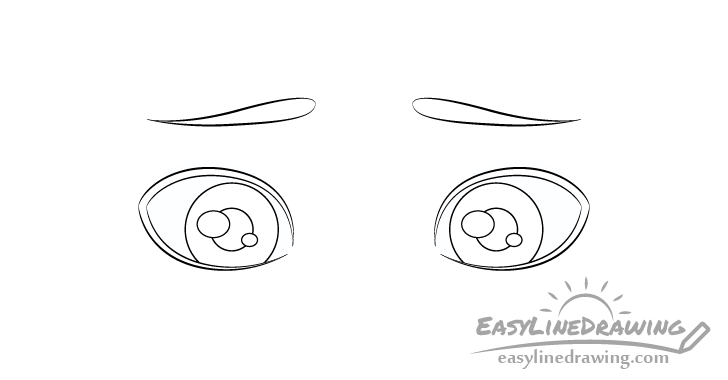
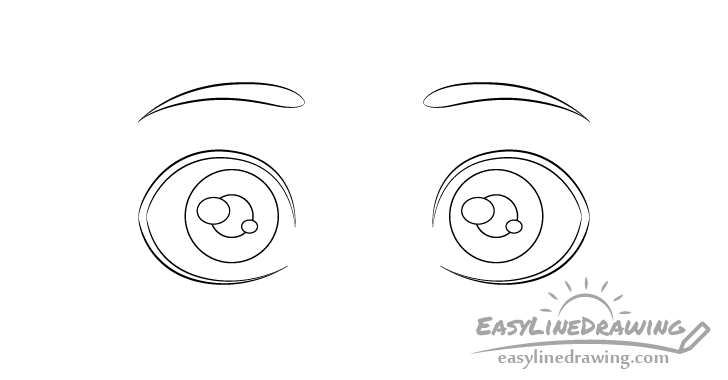
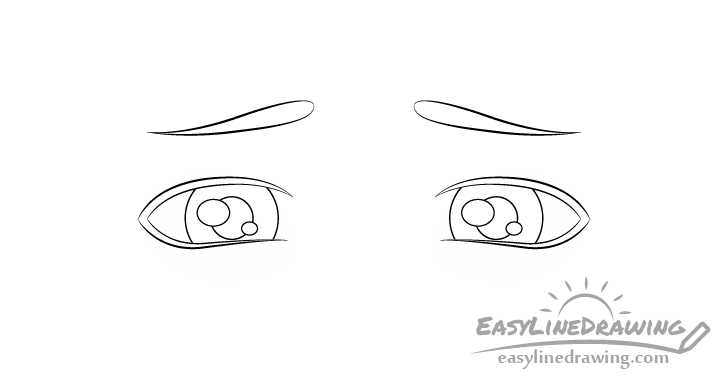
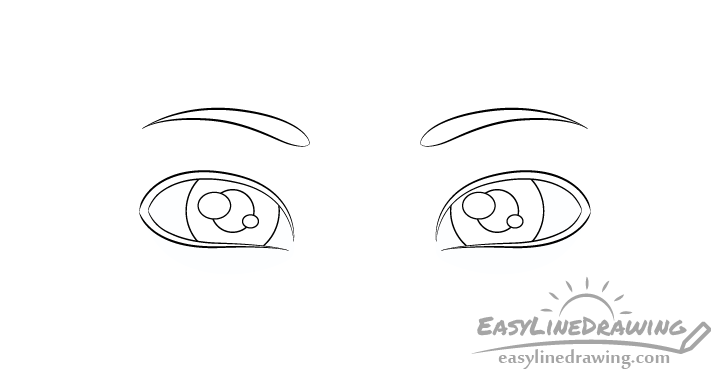
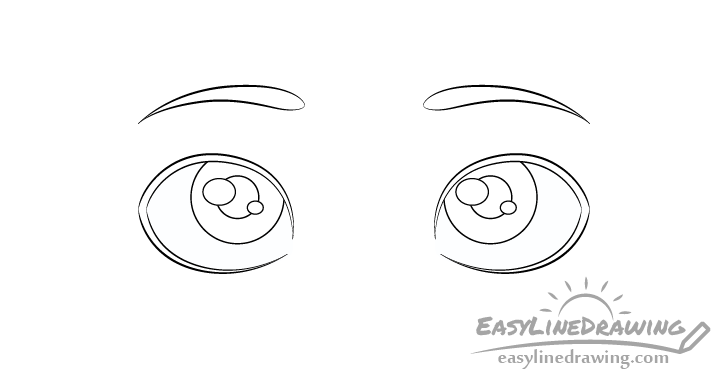
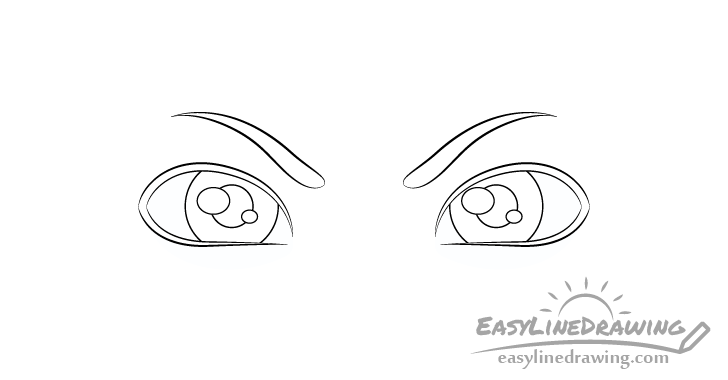
Step 4 – Draw the Pupils/Highlights
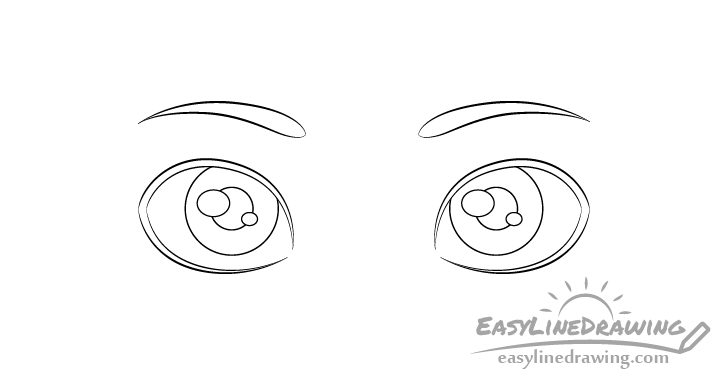
Inside each eye draw the pupils overlapped by the highlights (light reflecting from the eyes). Position the pupils directly in the center of the irises and make them round in shape.
Next draw a pair of oval highlights overlapping the outlines of the pupils and erase the parts of the pupils where the two overlap. Position the highlights on the opposite sides of each pupil with one higher up than the other. Also make one highlight larger and the other one smaller.
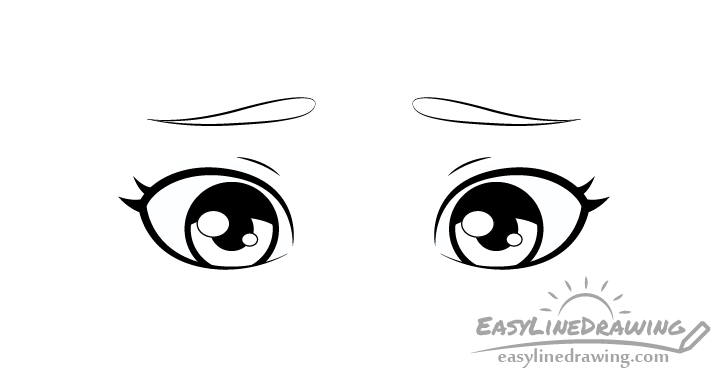
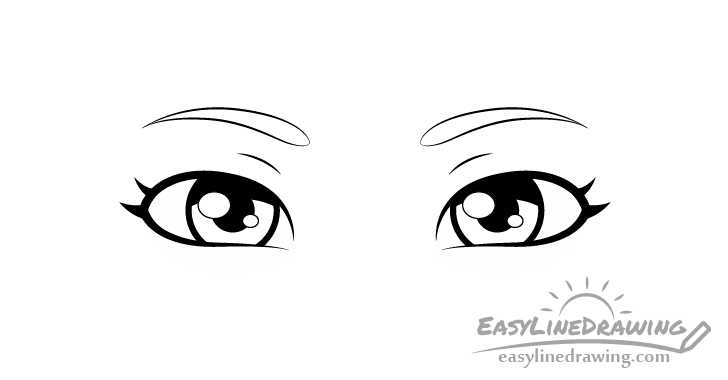
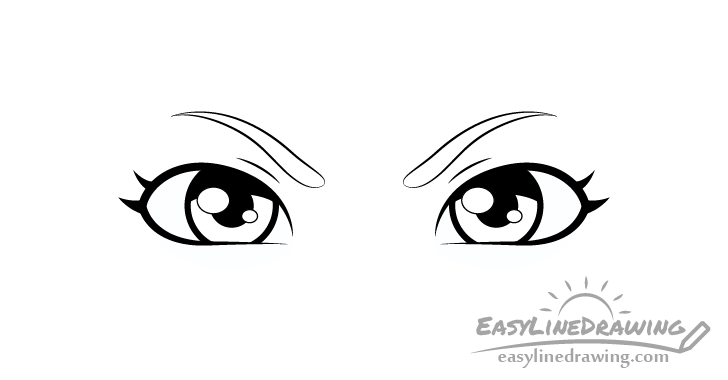
Step 5 – Add the Eyelids, Eyelashes and Shading
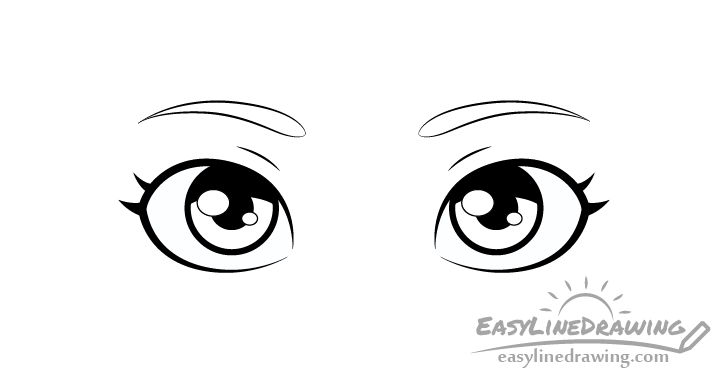
Just a tiny bit above the eyes give a hint of the upper parts of the eyelids with a pair of curved lines. You can have these curves pretty much follow the shape of each eye.
Once you add the eyelids you can shade the outlines of the eyes, upper areas of the irises and the pupils black or pencil shading. As mentioned at the start of the tutorial a good way to do this (if drawing on paper) is with a think black marker but you can also do it with the pencil.
Afterwards also trace over the rest of the lines using the marker darker pencil lines. However you DO NOT need to trace over the outlines of the highlights, you can leave these with light pencil outlines. Not having a dark outline around the highlights can them appear lighter and more like actual reflections. This is however optional as some cartoon styles do draw dark outlines around the highlights as well. So if you like the black outlines you can add them.
Next add some individual eyelashes to the outer corners of each eye. As these are stylized lashes you only need a few and you can make them fairly thick. You can again quickly outline the eyelashes with a pencil and then fill them in with black using a marker or shade them in with the pencil.
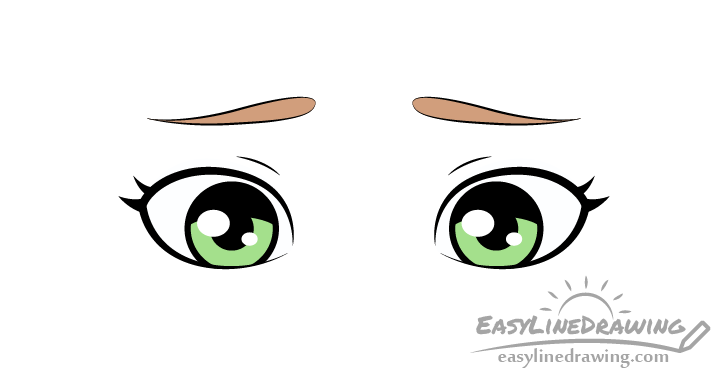
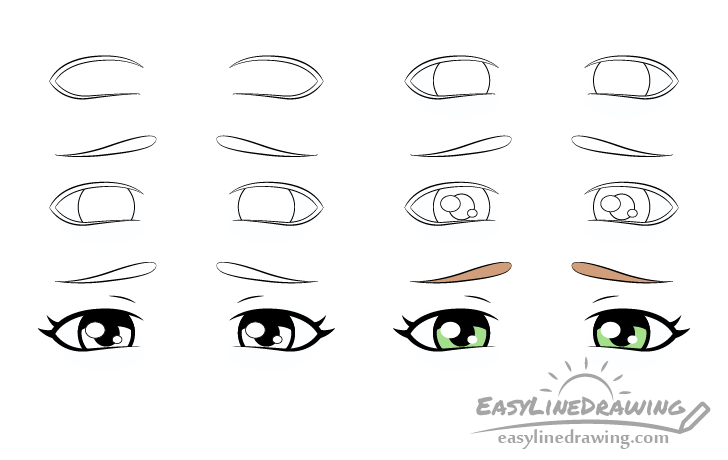
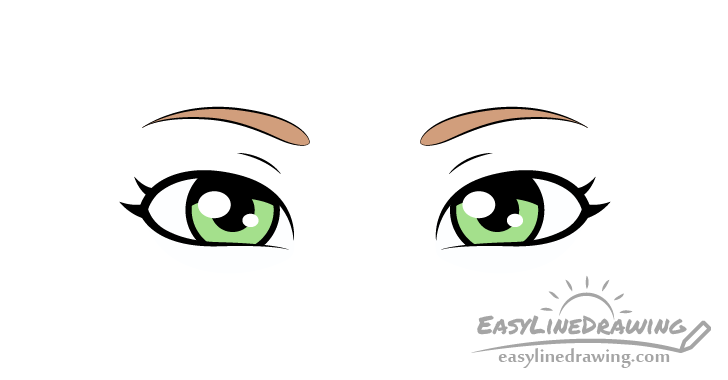
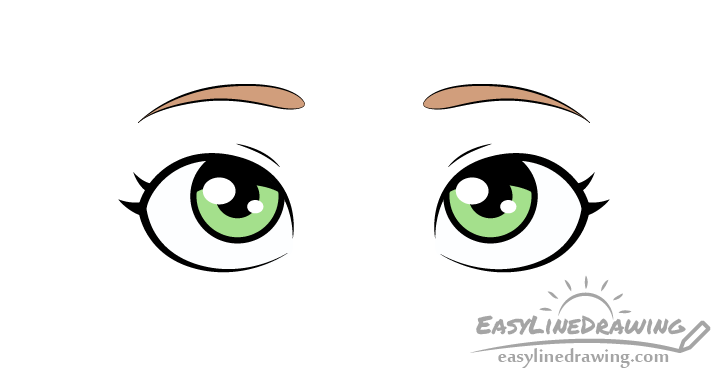
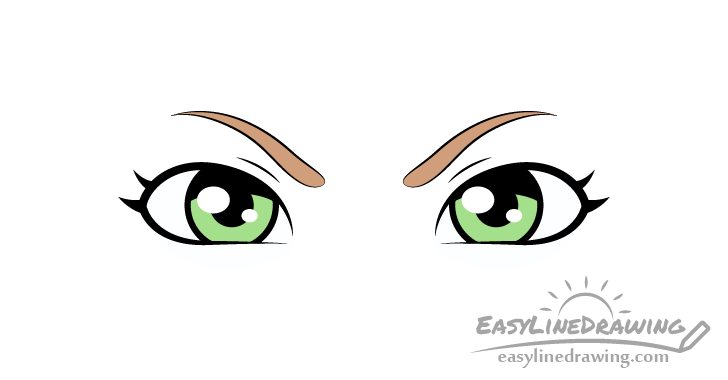
Step 6 – Color the Eyes
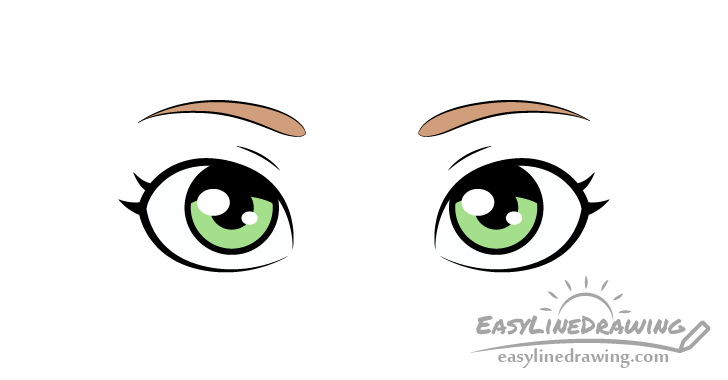
To finish the drawing color the pupils and the eyebrows. In this case the pupils will be green and the eyebrow brown as these colors go well together. Also be sure to leave the highlights white. If you chose to not have dark outlines around them you can carefully erase any visible pencil outlines so that they are completely white like in the above example.
Once done you should have a finished drawing of a cartoon pair of eyes.
How to Draw an Embarrassed Eye Expression Step by Step
This next set of eyes can be used to show an embarrassed expression or a guilty look.
Step 1 – Draw the Outlines of the Eyes
Draw the outline of the eyes with the upper eyelids just a tiny bit lower than for the normal expression. Meaning that the top curve of their outline should be slightly flatter.
Usually the upper eyelids tend to lower when the eyes are looking down (like they will be in this case).
Step 2 – Draw the Irises
To show that the eyes are looking down draw the outlines of the irises much lower than you would for eyes that are looking straight ahead. They should be partially covered by the bottom eyelids while leaving a tiny bit of space between them and the upper eyelids.
Step 3 – Draw the Eyebrows
Draw the eyebrows in reverse of their normal curve with their inner ends lifted up.
Step 4 – Draw the Pupils/Highlights
Draw the pupils at the center of the irises being overlapped by the highlights. While the entire inner part of the eye will be shifted down you can keep their position in relation the irises same as for a normal expression.
Step 5 – Add the Eyelids, Eyelashes and Shading
Add a hint of the upper part of the eyelids with a curved lines just a bit above each eye. Next either fill in the outlines, upper parts of the irises and pupils with a black marker or shade them in with the pencil. Afterwards darken your lines either again with the marker or with the pencil. Tracing over the outlines of the highlights is however optional.
Finally also add in some eyelashes to the outer corners of the eyes.
Step 6 – Color the Eyes
To finish color in the eyes and eyebrows but leave the highlights white.
How to Draw a Scared Eye Expression Step by Step
This example is of a scared or startled expression of the eyes.
Step 1 – Draw the Outlines of the Eyes
Draw the eyes wide open with their upper eyelids raised and their bottom eyelids lowered. Overall this will make the shape of the eyes much rounder.
Step 2 – Draw the Irises

Draw the irises much smaller than for a normal expression and position them fairly close to the inner ends of each eye (towards the middle of the face).
While in normal eyes the size of the irises does not change in cartoon eyes drawing them smaller can help emphasize a scared look.
Step 3 – Draw the Eyebrows

Draw the eyebrows higher up with their inner ends raised.
Step 4 – Draw the Pupils/Highlights
As the irises will be drawn smaller you will need to draw the pupils and highlights smaller as well.
Step 5 – Add the Eyelids, Eyelashes and Shading

Above each eye add a hint of the upper part of the eyelids. As the eyes are wide open you can draw the eyelid curves very close to the outlines of the eyes. Once done fill in the outlines, upper parts of the irises and pupils with a black marker or shade them in with the pencil. Next darken your lines by tracing over them with the marker or pencil. Tracing over the outlines of the highlights is optional.
Finally add a hint of eyelashes to the outer corners of each eye.
Step 6 – Color the Eyes

Finish the drawing by coloring the irises and eyebrows. Also remember to keep the highlights white.
How to Draw a Surprised Eye Expression Step by Step
This example is of a surprised expression which is very similar to the scared.
Step 1 – Draw the Outlines of the Eyes
Similar to the scared expression draw the eyes much wider than normal.
Step 2 – Draw the Irises
Unlike the scared expression draw the irises the same size as you would for a normal expression.
Step 3 – Draw the Eyebrows
Draw the eyebrows higher up and with their inner corners raised.
Step 4 – Draw the Pupils/Highlights
Inside each eye draw the pupil overlapped by a pair of highlights, same as you would for a normal expression.
Step 5 – Add the Eyelids, Eyelashes and Shading

Add a pair of curves (one above each eye) to show a hint of the upper parts of the eyelids. Again same as for the scared expression draw these closer to the outlines of the eyes than normal.
Fill in the outlines, upper parts of the irises and pupils with a black marker or shade them in with the pencil. Next trace over your lines with the marker or pencil as well. Again, tracing over the outlines of the highlights is optional.
Afterwards add in a hint of eyelashes to each eye (as shown in the example).
Step 6 – Color the Eyes

Finish the drawing by coloring the irises (leave the highlights white) and eyebrows.
How to Draw an Upset Eye Expression Step by Step
This example is of upset or sad eyes.
Step 1 – Draw the Outlines of the Eyes

For this expression make the eyes much narrower and draw their inner ends much farther apart than normal.
Also tilt the overall shape of the eyes in the opposite direction so that now they have their inner ends raised and outer ends lowered.
Step 2 – Draw the Irises
A large portion of both the upper and lower part of the irises should be covered by the eyelids (more so for the lower part).
Step 3 – Draw the Eyebrows

Draw the eyebrows in reverse of their normal curve with the inner ends raised and slightly closer together than normal.
Step 4 – Draw the Pupils/Highlights
Draw the pupils in the center of the irises overlapped by the highlights same as normal.
Step 5 – Add the Eyelids, Eyelashes and Shading

Add a pair of lines to show the upper part of the eyelids. As the eyes are drawn narrowed position the eyelid lines higher up in relation to them. Next fill in the outlines, upper parts of the irises and pupils with a black marker or shade them in with the pencil. Afterwards darken your lines again with either the marker or pencil. Tracing over the outlines of the highlights is optional. Once done you can also add in some eyelashes to the outer corners of each eye.
Step 6 – Color the Eyes

Finish the drawing by adding some color to the irises and eyebrows. Again remember to keep the highlights white.
How to Draw a Sly Eye Expression Step by Step
This example is of a sly expression like when a character is plotting something.
Step 1 – Draw the Outlines of the Eyes
For this expression draw the eyes much narrower than normal with the upper eyelids lowered and the lower eyelids raised.
Step 2 – Draw the Irises
Draw the irises with a good portion of both tier bottom and top being covered by the eyelids.
Step 3 – Draw the Eyebrows
You can draw the eyebrows same as for a normal expression.
Step 4 – Draw the Pupils/Highlights
Draw the pupils in the center of the irises with overlapping highlights (same as normal).
Step 5 – Add the Eyelids, Eyelashes and Shading
Add a hint of upper part of the eyelids above the eyes. As the eyes are narrower draw the eyebrow farther up in relation to them than you would for a normal expression.
Fill in the outlines, upper parts of the irises and pupils with a black marker or shade them with the pencil. Next trace over your lines again with either a marker or pencil. Tracing over the outlines of the highlights is optional.
Finish this step by adding a pair of eyelashes to the outer corners of each eyes (as shown in the example).
Step 6 – Add Color
Finish the drawing by applying some color to the irises and eyebrows (remember to keep the highlights white).
How to Draw a Thinking Eye Expression Step by Step
This example can be used for showing a thinking, daydreaming or puzzled expression of the eyes.
Step 1 – Draw the Outlines of the Eyes
For this expression draw the eyes open wider than for a normal expression but not as wide as for the scared/surprised ones.
Step 2 – Draw the Irises
Draw the eyes rolled up by positioning the irises further up and slightly closer together than normal. A good portion of their upper end should be covered by the eyelids.
Step 3 – Draw the Eyebrows
Draw the eyebrows somewhat raised with their inner ends higher.
Step 4 – Draw the Pupils/Highlights
Position the pupils in the center of the irises overlapped by the highlights (same as normal).
Step 5 – Add the Eyelids, Eyelashes and Shading

Draw a curve above each eye to give a hint of the upper part of the eyelids. As the eyes are wide open position it closer to their outlines than you would for a normal expression.
Fill in the outlines, upper parts of the irises and pupils using a black marker or shade them in with the pencil. After that also trace over your lines again with the marker or pencil. Tracing over the outlines of the highlights is optional. Next add a some individual eyelashes to the corner of each of the eyes.
Step 6 – Color the Eyes
Finish the drawing by adding color to the irises (leave the highlights white) and eyebrows.
How to Draw an Angry Eye Expression Step by Step

This example can be used to show an angry or “ticked off” expression of the eyes.
Step 1 – Draw the Outlines of the Eyes
For this expression draw the yes much narrower than normal and with the inner ends of their upper eyelids lowered even further.
Step 2 – Draw the Irises
Draw the irises with a good portion of their tops and bottoms covered by the eyelids.
Step 3 – Draw the Eyebrows
Draw the eyebrows much lower down with their inner ends lowered past the upper curve of the eyelids.
Step 4 – Draw the Pupils/Highlights
Draw the pupils in the middle of the irises being overlapped by the highlights same as normal.
Step 5 – Add the Eyelids, Eyelashes and Shading
Add a hint of the upper part of the eyelids above each of the eyes. While normally these would be higher up in relation to narrowed eyes in this case they are also being pushed down by the eyebrows so you can draw them lower down.
Fill in the outlines, upper parts of the irises and pupils with a black marker or shade them with the pencil. Afterwards once again use either a marker or pencil to darken your lines by tracing over them (tracing over the outlines of the highlights is optional).
Finish this step by adding a pair of eyelashes to the outer corners of each eyes (see example).
Step 6 – Color the Eyes
Finally add some color to the irses and eyebrows to finish the drawing. Also remember to keep the highlights white.
Conclusion
Due to the variety of examples and the detailed drawing steps this tutorial is quite long. To reduce the amount of repetitive drawing instructions the first example provides the most detailed breakdown of the drawing process with the rest focusing more on how the different parts of the eyes shift based on a given expression. For this it was recommended at that start of the tutorial that you read over the drawing instruction for the “normal eye expression” example before going into any of the other expression. If you may have missed it again it’s recommended that you go back and read over those drawing instructions if you want a better understanding of why things are drawn a certain way. Other than that hopefully this tutorial helped you get a better understanding of how to draw different kinds of eye expressions in a cartoon style.
If you liked this tutorial you might also want to try some of the following:
- How to Draw Lips Step by Step
- How to Draw an Ear Step by Step (Easy)
- How to Draw a Boy Step by Step
- How to Draw a Fox Step by Step
- How to Draw a Cat Step by Step
- How to Draw a Penguin Step by Step


