How to Draw a Pineapple Step by Step
This tutorial shows and easy way to draw a pineapple in eight steps going from a basic outline to a detailed and colored drawing.

A pineapple has a somewhat complex shape which can make it a little bit confusing as to how you should draw one. To make things simpler this tutorial provides a detailed step by step breakdown of the drawing approach which should make it easier to understand.
Be sure to start the drawing in pencil and make very light and thin lines that you can easily erase as you will need to do so in one of the steps. Light lines will also make it easier to correct any potential mistakes.
Step 1 – Draw the Outline of the Pineapple

Being by drawing an outline of the pineapple. It should be similar to an oval but with a somewhat flattened top and bottom.
Also be sure to have enough room at the top of your drawing area for the crown of leaves. These will be almost as tall as the pineapple itself so leave quite a bit of space.
Step 2 – Add the Bottom of the Crown

On top of the pineapple outline add the first part of the crown of leaves. Draw the ones at the very bottom bending downwards and overlapping the line that defines the pineapple (in this example there are just three of them). Erase the part covered by them after you’re done.
Next draw the leaves that are sticking outer more upwards.
Step 3 – Add the Middle of the Crown

On top of the leaves from the previous step draw the next batch. These should be slightly longer pointing a little bit more upwards.
Step 4 – Add the Top of the Crown

Finally draw the top part of the crown with the longest leaves pointing upwards and curving just a tiny bit to the sides.
Step 5 – Draw the First Part of the Pattern

To draw the pattern of the pineapple first make one set of lines (sort of like stripes) on an angle across it’s surface. Be careful to make the lines on an angle similar to the example. If you tilt them too much one way or the other the little rhombuses that are going to be created in the next step can end up looking very distorted.
Step 6 – Finish the Pattern

Now draw a second set of lines going in the opposite direction and overlapping the first set to create the patter of the little sections the pineapple is made up of.
Step 7 – Draw the Bracts
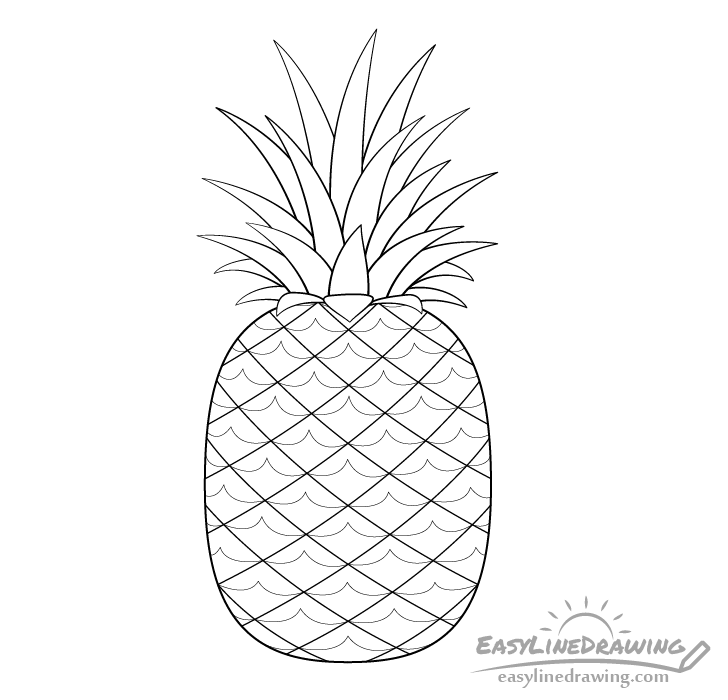
Inside each section created in the previous two steps draw a little tooth like shape of the bracts. Once done these should look a little bit like waves going across the pineapple.
Step 8 – Color the Pineapple
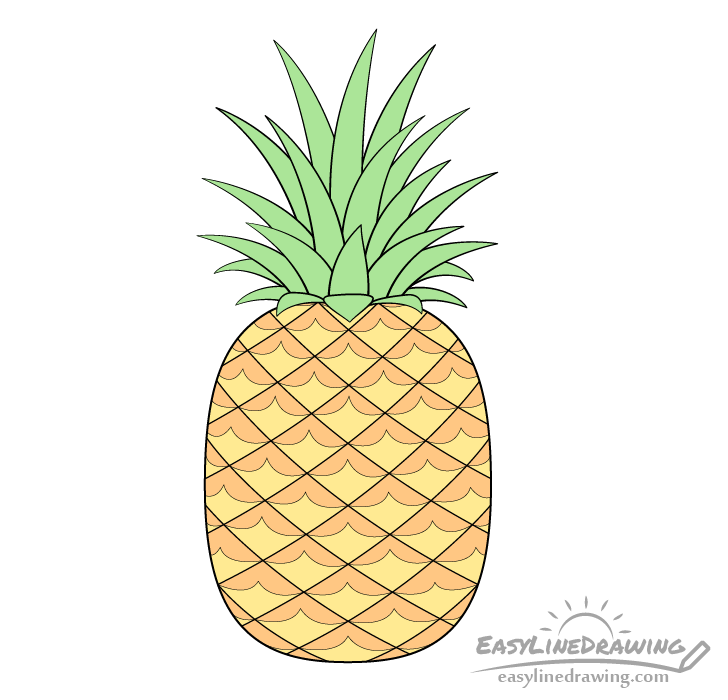
The easiest way to color the pineapple is probably with colored pencils or markers (or a combination of the two). Paints may not be a good option as it will be hard to fill each little section with a brush without going over the edges.
For the actual colors make the leaves a yellow/green, the pineapple orange (with a bit of brown) and the bracts yellow. If you don’t have a pencil that matches the color you want exactly you can simply mix them. For example first fill in the pineapple with orange and then lightly go over it with brown.
Conclusion
A pineapple has a lot of parts making which can make it somewhat confusing and time consuming to draw. However if you use a step by step approach as suggested in this tutorial it can make drawing one much easier and more organized. Also as mentioned at the start it’s always a good idea to begin a drawing (especially a more complex one like a pineapple) with light pencil lines that you can easily erase in case you make a mistake.
For more similar tutorial also see:
- How to Draw an Orange Step by Step
- How to Draw a Mango Step by Step
- How to Draw a Banana Step by Step
- How to Draw a Hazelnut Step by Step
- How to Draw a Papaya Step by Step

")


