How to Draw Broccoli Step by Step
This tutorial shows how to draw a broccoli bunch in six steps with simple illustrated examples and easy to follow instructions.
A broccoli bunch generally has quite a bit of detail along with many irregular shapes. This can make drawing one a bit of a challenge. To help this guide shows how you can create a much simpler stylized drawing yet also still keep the plant easily recognizable. This can be a good way to start as a beginner or simply a fun way to pass some time.
It’s recommended that you start the line drawing part of this tutorial using a pencil. Although, the guide does not necessarily require you to do any erasing it’s good to have the option in case you happen to make a mistake. For this same reason you should also keep your lines fairly light until you have all parts of the broccoli outlined. You can then darken them before coloring.
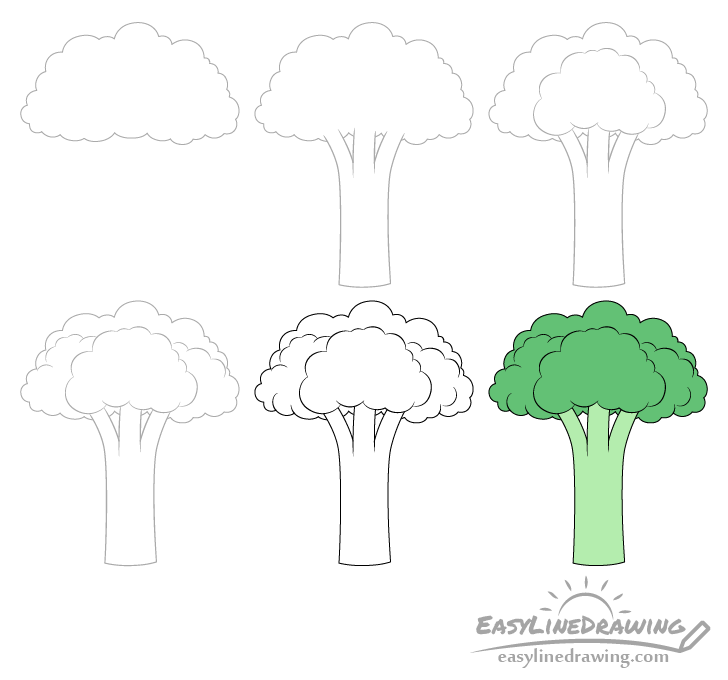
Step 1 – Draw the First Bunch of Florets

The top part of a broccoli (the crown) is generally composed of little bunches of florets. Start by outlining one of these in the upper middle of your drawing area. Be sure to leave plenty of room below for the stalk and a bit of room above and on the sides for the rest of the crown.
As this drawing is somewhat stylized outline the floret bunch with a series of curves of slightly varying sizes so that it looks like a small cloud (as shown in the example).
Step 2 – Draw the Side Florets

Sticking out from behind the center bunch draw two more clumps of florets (one to each side). You can define these in pretty much the same way as the first one. Outline each with a series of little curves.
Step 3 – Draw the Crown

Finish the outline of the broccoli’s crown by adding another cloud-like shape on top of the three floret bunches. Yet again, define this using a series of curves.
Step 4 – Draw the Stems

Going down from the florets add the stems. In this example there are three. Draw the ones on the sides to be slightly curved and make the one in the middle straight (as you are looking directly at it you can’t see the curve).
Step 5 – Draw the Stalk

Finally, to finish the line drawing add the stalk of the broccoli running down from the stems. Make it much thicker in comparison and give it a bit of a wave-like outline at the bottom.
Once you have the entire broccoli outline trace over your lines to darken them. Either do this by pressing harder on the pencil or use a thin black marker.
Step 6 – Color the Broccoli

To color the broccoli colored pencils or watercolor paints can both be great options. Make the crown a dark green and the stems and stalk a much lighter green.
If using a green pencil you can get the darker green by applying more pressure to it and/or by adding the color in several layers. If using watercolors you can simply add more or less water to create the darker or lighter green.
Using something like markers may not be as suitable because they generally wont allow you to create the different variants of green as easily (unless you have two different variations to begin with).
Conclusion
Drawing a broccoli bunch can be a challenge due to it’s irregular shape and the many small florets that comprise it’s crown. This tutorials shows how you can stylize the drawing to make it much simpler yet at the same time still keep the plant easily recognizable.
Creating such artwork can be a great way to get started as a beginner or to just have some fun.
If you like these kinds of simple but helpful guides also be sure to try the following:
- How to Draw a Tree Step by Step
- How to Draw an Onion Step by Step
- How to Draw a Cucumber Step by Step
- How to Draw a Log Step by Step
- How to Draw Green Peas Step by Step


