How to Draw a Butterfly Step by Step
This tutorial shows how to draw a butterfly. It provides easy to follow illustrated examples and straightforward step by step instructions.

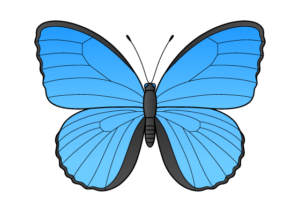
The butterfly shown as the example drawing is based on a blue morpho. However, it is somewhat simplified to make the guide more beginner friendly. As the name implies, the butterfly is largely blue in color but there are also some black patterns on it’s wings. All you need to draw it is a blue and a black or regular pencil. Although, also having a dark blue pencil can help you make the drawing a little nicer.
It’s recommended that you start the tutorial in regular pencil and keep your lines light so that they can be easily erased if you need to make correction. Darken them once you have all parts of the butterfly outlined.
Step 1 – Draw the Body of the Butterfly

First, draw the butterfly’s body. In this case (as is fairly common for butterflies of all kind) it has a thicker upper section and a thinner lower section.
Outline the upper section to be thicker in the middle and give it a slightly flattened top.
Draw the lower section to be thicker towards it’s bottom middle area and give it a somewhat pointy but still rounded bottom.
Define the area where the two section are joined with a light curve.

You can optionally make a straight vertical line to help you insure that the drawing of the butterfly’s body does not get skewed to one side (as shown in the example above). This line can also make it easier to see if both of it’s halves are even in width.
If you choose to draw the guide line you can erase it after adding the antennae in step four.
Step 2 – Draw the Head

On top of the body draw the head. first make it wider as it goes up from and then narrower again ending with a rounded upper tip. Next, draw the butterflies eyes. Position them on each side of the heads upper section (the part that gets narrower as it goes up). Make each eye somewhat close in shape to a half circle.
Step 3 – Draw the Wings

Outline the butterfly’s wings starting with the upper pair. Draw them to be slightly raised and make each one wider as it goes out from the body. On the side of each wing add a series of little bump that butterflies of this type generally have in that area. You can either define them right away or draw the wings without them and then add the bump in afterwards (erasing parts of each wing’s initial outlines).

After you have the top pair of wings drawn out add the bottom pair. Again, make these wider as they go out from the body (for about half their entire length). They should then become curved with little bumps on their outer edges. You can draw these in the same way as those along the first pair of wings.
Step 4 – Draw the Antennae

Draw the butterfly’s antennae going up from the head and curving in opposite directions. Give them little thicker sections on their ends (called knobs).
Step 5 – Draw the Spiracles

Along the bottom of the body’s lower section draw the spiracles. These are a series of stripes that butterflies have in that area (used for breathing).
Step 6 – Draw the Wing Pattern

As mentioned at the start of the guide, this particular butterfly has some black wing patterns. Outline these along their edges as shown in the example.
Step 7 – Draw the Wing Veins

For the last part of the line drawing add the wing veins.

As these are somewhat complex you can see a step by step breakdown of drawing them in the example above. Generally, you first want to define the veins in the upper middle of each wing as most of the other veins are connected to them. Draw the veins along one side of the butterfly and then add them to the other side mirroring the first set.
Once you’ve added the veins you can trace over your drawing with darker pencil lines or a thin black marker.
Step 8 – Darken the Wing Pattern

Using either a regular pencil or a black pencil crayon darken the areas along the edges of the wings (outlined in step six). Next, again using either a regular or black pencil also darken the body (leave the eyes white). However, do this in a way where you create a gradient that make one side slightly lighter than the other. This will give the butterfly’s body a more three dimensional appearance. Also, darken the little thicker bits on the ends of the antennae.
Step 9 – Color the Butterfly

To finish the drawing add a dark blue to light blue gradient along the butterfly’s wings (going top to bottom). Color it’s eyes blue as well.
Again, as mentioned at the start of the tutorial, you can create the gradient using a dark blue and a light blue pencil crayons. However, if you only have one blue color you can create the gradient by lightly darkening the upper parts of the wings with a black or regular pencil. You can alternatively leave out the gradient all together and simply make the wings blue.
Conclusion
This guide shows how to create a butterfly drawing based on a blue morpho. It provides a somewhat simplified beginner friendly examples.
Generally, as shown throughout the steps, you want to first outline the overall shape of the butterfly and then add the various details.
Hopefully, you’ve found the guide helpful and easy to follow.
For more similar drawing tutorials also try the following:
- How to Draw a Toucan Step by Step
- How to Draw a Flower Step by Step
- How to Draw a Goldfish Step by Step
- How to Draw a Tortoise Step by Step